Sunday, June 15, 2014

tzatziki chicken salad and chipotle lime shrimp tacos

On the way home from the beach yesterday I consumed a quarter of a sriracha bagel (my new favorite), one Boston cream donut, a meal from Chick-Fil-A and four peanut butter crackers. I told myself I would make dinner when we got home. Except…we had no food. And after spending wayyyy longer in the car than we should have, I was not about to head to the store. So, we got Subway. And then we each had an apple fritter for dessert. And I finished another quarter of sriracha bagel.

OH FOR THE LOVE OF CARBS!

I woke up this morning determined to get back on track with my eating. I scarfed down two scrambled eggs and spent the morning recipe-searching and grocery shopping. We loved both of the recipes I tried today—chicken salad for lunch and shrimp tacos for dinner. (I didn’t make side dishes for either.) I have a feeling I’ll be making both of them a lot this summer! Click on the recipe title to view the original recipe.

pic by José Picayo
adapted from Cooking Light
makes 3 generous servings, but you could stretch for 4 if using pita chips or pita bread

2/3 cup plain reduced-fat Greek yogurt
1/4 cup finely chopped red onion
1 tablespoon fresh lemon juice
2 teaspoons chopped fresh dill (I used double because I love dill!)
a tiny pinch of salt (add more to taste)
1/4 teaspoon freshly ground black pepper
1 cucumber, seeded and diced (I peeled mine)
1 garlic clove, minced
2 cups shredded or diced cooked chicken (I grilled up one and a half insanely large chicken breasts, but you could use a rotisserie chicken)

Combine first 8 ingredients, then toss with chicken to coat. We at it plain, but the recipe suggests serving it with pita chips. We loved it just how I made it, but I bet feta would be yummy in there (and maybe black olives, too). I’m also tempted to serve it in lettuce cups next time!
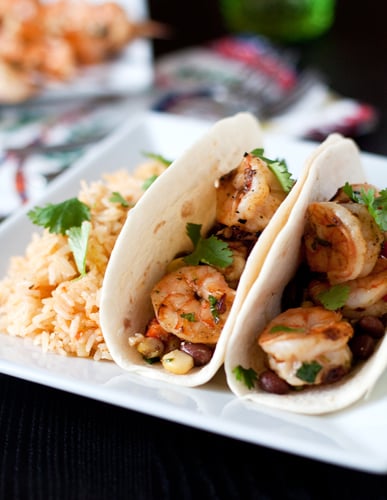
from My Baking Addiction
Chipotle Lime Shrimp Tacos with Corn & Black Bean Salsa
adapted from My Baking Addiction
makes 8-10 tacos depending on the size of your tortilla

small taco-sized flour tortillas
1 pound shrimp; peeled and deveined
sour cream or greek yogurt 

for the marinade 
1 chipotle pepper in adobo; chopped* (in the International aisle alongside jalapeños and green chilies)
1 tablespoon olive oil
1 teaspoon cumin
1 tablespoon brown sugar
1 lime (juice and zest)
2 tablespoons cilantro; chopped

for the salsa
3 tablespoon balsamic vinegar
1 tablespoon olive oil
1/2 teaspoon salt
1/2 teaspoon white sugar
1/2 teaspoon ground black pepper
1/2 teaspoon ground cumin
2 tablespoons chopped fresh cilantro
1 (15 ounce) can black beans, rinsed and drained
1 (15 ounce) can sweet corn, drained OR fresh corn cut from the cob
1/2 orange or red pepper; diced
1/2 or whole jalapeno; seeded and diced
2 green onions, sliced

1. Combine marinade ingredients and let sit while you work on the salsa. (I don’t actually put the shrimp in the marinade, because I cook the shrimp in a skillet and use the marinade as more of a sauce.)
2. Combine the salsa ingredients in a separate bowl.
3. Grill shrimp or cook in a lightly oiled skillet over medium heat (about two and a half minutes per side.)
4. If you like, chop the shrimp into bite-size pieces. Add shrimp to marinade.
5. If you like, heat tortillas over the stove. Spread sour cream down the middle of each tortilla and top with the salsa and then the sauce-covered shrimp.

Enjoy!

*You’ll have leftover chipotle peppers in adobo sauce. They’ll keep in the fridge for a week or two. If you don’t plan on using your leftover peppers anytime soon, freeze them in ice cube trays or in a freezer bag.

Monday, June 2, 2014

in the waiting


16/17/18 weeks!

We’ve been singing this song at church a lot lately and it moves me to tears every time I sing along. My favorite lines:You finish what you begin. You see it through til the end. In the silence, in the waiting, still we can know you are good. All your plans are for Your glory, yes we can know you are good. The Lord our God is ever faithful, never changing through the ages.

Enjoying this waiting has been a challenge. I need that reminder… as much as I don’t want to feel how I feel or think what I think... still I know God is good.

I keep thinking about when I was this far along with John. I’ll be 19 weeks tomorrow, and just like last time I’m anticipating the anatomy ultrasound. Unlike last time, I’m going into this one with a lot of dread mixed in with the joy. I hate it. I hate that for weeks now I have felt like throwing up when I think about that appointment. I hate that I cried until I couldn’t breathe after I finally called and scheduled it. I hate that I keep grasping for peace as if it is out of reach, as if I’m stuck being fearful (when that isn’t the truth).

"For God hath not given us the spirit of fear; but of power, and of love, and of a sound mind.”
2 Timothy 1:7

I’ve been resisting writing this post because it’s hard to explain what I’m feeling, and it’s even harder when people respond with platitudes. “It will be okay!” “You’re meant to be a mom!” If I mention an ounce of fear, I’m being negative. If I say, “well, if something does go wrong with the baby…” then I’m being cynical. Here’s the thing: I’m not just thinking about what it was like to be pregnant with John—I’m also thinking about how this time last year I was literally waiting for my baby to die. I don’t LIKE that I’m struggling with fear! I don’t like that it is impossible for me to not imagine a scenario in which this pregnancy doesn’t go as planned. 

It sounds like I’m in the depths of despair, and I’m really not. Promise. I have big cries and little cries and the occasional panic attack, but the majority of each day is spent practicing finding satisfaction in this stage of life God has put me in. Even though my inclination is to want to rush to the finish line, I’m trying to appreciate these months before baby. When I get discouraged, I remind myself that not only am I still grieving John, but I’m pregnant. I’m bound to be emotional and tired at times. 

Let’s move on to the good stuff. Almost 19 weeks! Almost halfway! I can’t believe this is only my second baby post for this pregnancy. I’ve been feeling flutters for a couple of weeks now, and I never get tired of them. My belly, as you can see in the pics, is insane. Andy says, “oh my gosh, your belly!” EVERY day. I actually like that I’m showing a lot. I’m sure that will change in a month or so, but for now it gives me a little comfort. Hopefully my roundness comes from a growing baby and not just from the food I’ve been scarfing down (like the three strawberry sour cream scones I’ve eaten today).

There are two other preggos in my small group (yay!) and we recently went around and heard advice from the other women on things to do/relish before the baby comes. I loved their input (travel! sleep in! eat out!) and would love to hear yours!

A few things momma and baby have been up to lately: 
reuniting with Amy, one of my college roomies
(and buying a few things for your nursery at the Luckett’s Spring market)
snuggling with Autumn while the daddies went golfing
watching daddy and grandpa play golf

Sunday, May 25, 2014

At-home Crunchwrap Supreme

HOW HAVE I NOT MADE THESE UNTIL TODAY?

It’s really embarrassing how often I’ve thought of crunchwrap supremes from Taco Bell during this pregnancy. If I got one every time I thought of one…well…I’d probably deliver a baby covered in nacho cheese. LOL ew!!!

Anyway, I had a lightbulb moment the other day when it occurred to me that I can make a crunchwrap at home. DUH. I did some web searching and it turns out there are other crunchwrap lovers who had the smarts to try it years ago. The ingredients are obvious, but I thought it would be helpful for you to know exactly what I did/bought. If you can’t find tostadas, you could break taco shells in half and make two rounds or buy the “crispy rounds” chips by Tostitos. Some of the recipes I found said their large tortillas weren’t big enough to wrap around the tostada shell. Mine worked fine and looked exactly like the picture below.

from blessthisfood.blogspot.com

At-home Crunchwrap Supreme
makes 6 (one was enough for me, Andy ate two)
takes around 20 minutes

1 lb ground beef or a little more (mine was 1.18 lbs, and I bought 85/15)
1 package of large flour tortillas (I bought store brand because they were the cheapest)
1 package of tostada shells (I used La Casona brand from the international aisle)
1 can of nacho cheese (I used regular el Rio that I found in the international aisle)
1 packet taco seasoning (I usually get whatever is on sale and is low sodium. This time I used Ortega.)
chopped lettuce
sour cream
tomatoes (though I didn’t use any)

1. Brown ground beef and add taco seasoning (following directions on packet).
2. Pour some nacho cheese into a small saucepan and heat over low, stirring now and then. (You can also heat the cheese in the microwave. You only need 1-2 Tbsp per wrap.)
3. While the beef is cooking and cheese is warming, set up your other ingredients for easy assembly.
4. Spoon several spoonfuls of cooked taco meat into the center of a large tortilla. Spoon some nacho cheese over the meat.
5. Top the cheesy taco meat with a tostada, then top the tostada with sour cream, tomatoes and lettuce.
6. Fold the tortilla over the tostada. I pulled from left to center and then right to center, and then had to fold twice along the top and bottom. If that doesn’t make sense…just try to imitate the pic above. :)
7. Once your crunchwraps are assembled, place a nonstick skillet over medium heat until the pan is nice and hot.
8. Carefully place your crunchwraps seam side down in the skillet. At least two will fit in a large pan, if not more.
9. After a minute or so, use a spatula to carefully lift up the crunchwrap. It should be browned but not super dark. If it looks ready to flip, turn it over and heat the other side for about a minute. Adjust heat if you’re having problems—cooking mine over medium heat was perfect.

You’re gonna love ‘em.

Monday, May 19, 2014

Laura’s chicken bacon alfredo over spaghetti squash

Oh, pregnancy hormones. You are such a pleasure.
Not.

I was super proud of myself for taking New York by storm. No naps! Little sleep at night! Lots of walking! When I got home, though, it was like I had been hit by a truck. After having a few big “I don’t know why I’m crying" cries, I realized I was beyond exhausted. I started making a short to-do list for each day, thinking that if I only gave myself a few tasks to accomplish then I wouldn’t feel so guilty for falling asleep on the couch. I’m walking every day (not very far), but I know that eating better would go a long way in giving me more energy. I’m finally back to eating eggs for breakfast most mornings—yay! I’m hoping to start adding oatmeal in as well. Both foods sounded horrible to me during my first trimester! 

I had one of my college roomies in town this weekend and saw her visit as an opportunity to get back on the healthy cooking wagon. Amy is gluten-free and tries to take it easy on sweets. I’m on a mission to get people to start eating spaghetti squash, so of course I had to make it for her! I came across a recipe for Skinny Spaghetti Squash Alfredo recently and knew I wanted to make something similar. I didn’t take a picture of mine because I stirred it together in one big pot and it wouldn’t have photographed well, but I’ll try to remember to take pics next time I make it—which will be soon! It was fantastic. We all loved it.

(But, if you’re pregnant and exhausted and have just spent 5 hours on your feet, maybe get take out. Otherwise you might drop every cooking utensil accidentally and almost forget certain ingredients and eventually say to your friend or spouse, “I might cry any minute now.”)

Notes:
-I used way less cheese (and a little less milk) than my inspiration recipe called for. We didn’t miss the extra cheese, but I’m sure it’s delicious both ways. I like the idea of adding red pepper flakes and plan to do that next time.
-The second time I made this dish I added sautéed bell pepper and mushrooms. We loved it! I used one half of a yellow and one half of a red, but you could use less. I used maybe 5 or 6 large button mushrooms.
-The leftovers are GREAT. The sauce will thicken a ton in the fridge, but just scoop out a spoonful and add it to the pan when you’re reheating leftovers.


from thecomfortofcooking.com

Laura’s chicken bacon alfredo over spaghetti squash
serves 4

1 large spaghetti squash
3-4 slices of bacon
1 lb chicken breasts or tenders, sliced into bite-sized pieces
1/2 yellow onion, diced
3/4 cup milk (I used low fat)
1/4 cup grated parmesan cheese, plus 2 extra Tbsp for topping
2 Tbsp flour (I used 2 Tbsp of Pamela’s Baking Mix to make it gluten free for Amy)
2 Tbsp butter
1 or 2 Tbsp cream cheese (optional—it adds creaminess but isn’t necessary if you don’t have it)
1 Tbsp vegetable or olive oil
3 cloves garlic, minced
Italian seasoning
salt and pepper
3-4 leaves of fresh basil, chopped (optional—but worth it!)

1. Cut the squash in half length-wise using your incredible muscles or ask your husband to do it if you’re weak like me. Scrape out the seeds and goopy squash into the trash. Place half of a tablespoon of butter in each piece of squash and microwave each piece for 8-9 minutes. (I put mine in the microwave cut side up, but you could do this instead, and microwave both at the same time.) Use oven mitts when removing the squash from the microwave. Move on to the following steps while the squash is cooking:
2. Fry bacon. While bacon is frying, slice the chicken and dice the onion if you haven’t done so already.
3. Season chicken pieces with salt, pepper and Italian seasoning.
4. Remove bacon from pan and pour out most (but not all) of the bacon grease. Sauté onion in remaining bacon grease over medium heat until nicely browned, then remove from the pan.
5. Add oil to the pan you cooked the bacon and onion in and turn to medium heat. Add chicken pieces and stir often. Covering the pan will make the pieces cook faster. Keep an eye on it—it’s ready when you can easily use a spatula to chop the chicken into even smaller pieces. Remove pan from heat. (Don’t forget to microwave your second piece of squash if you haven’t already done so!)
6. In a small saucepan, heat remaining tablespoon of butter over medium low heat. Add minced garlic. Whisk in 2 Tbsp of flour and cook for two minutes (continuing to whisk), then slowly add in milk, raising the heat to medium and continuing to stir. Add cream cheese if desired. Whisk until smooth, then remove from heat and stir in parmesan cheese.
7. Using a fork (or two), shred the spaghetti squash. You’ll get a ton out of it if you just keep scraping the sides!
8. Place shredded squash in the pan along with the chicken. Add crumbled bacon and onions and stir to combine, then stir in alfredo sauce. You will probably need to add more salt and pepper since the squash isn’t seasoned. Sprinkle with fresh basil and additional 2 Tbsp of parmesan cheese and serve!

What do you think of the way I’m writing out my recipes? How can I make them more user-friendly? Would you like the ingredient list to be bulleted or numbered? Should I nix the numbering of steps? I’d love your thoughts/suggestions!

Sunday, May 11, 2014

Laura’s favorite steak salad


Why don’t I make this more often? It’s SO good. I picked up sirloin steak because it was buy one get one free, but I’ve use skirt steak in the past (and flank would work, too). I used my cast iron skillet to cook the steak. If you don’t already own a cast iron skillet, I highly recommend getting one! My steak came out medium, so adjust cooking times if you like it more or less cooked. You could nix the shallots (raw red onion would be yummy), swap feta for goat cheese, gorgonzola or blue cheese, use fresh blueberries or cherries instead of dried cranberries…the possibilities are endless. You’ll have leftover vinaigrette, but it will keep well in the fridge for a week or so.

Steak salad 
with crispy shallots, sugared pecans, dried cranberries and feta cheese
makes two generous portions

a little under 1 lb. steak (this gives each person a LOT of steak—which was awesome—but you can certainly use less)
2 Tbsp vegetable oil
1 Tbsp olive oil
1/2 Tbsp butter
3/4 bag of mixed spring greens
1 shallot, chopped into rings
1/4 cup chopped sugared pecans (you can buy these at the store or make them yourself. They keep well!)
1/8 cup dried cranberries
2 Tbsp feta cheese
salt and pepper

for the dressing, shake the following in a jar:
1/2 cup red wine vinegar
1/2 cup olive oil
1.5 Tbsp lemon juice
1/2 Tbsp dijon mustard
1 tsp honey (add more honey to taste if needed)
1 tsp salt
freshly ground pepper

1. Rub steak with vegetable oil and generously sprinkle salt and pepper on both sides. Let the steak sit on the counter 10-30 minutes under some plastic wrap—long enough for the steak to come to room temperature.
2. When you’re ready to start cooking, preheat your oven to 350 and place a dry large cast iron skillet on the stove over high heat.
3. Rub some butter in the pan—just enough for it to coat the pan and stat bubbling. Place your steak in the pan and leave it alone for three minutes.
4. Flip the steak and cook for two and a half more minutes.
5. Move steak to your preheated oven (still in the cast iron skillet) and cook for three minutes. Use a meat thermometer if you’re unsure if your steak is cooked enough. If it’s not, you can pop it back in the oven and check on it every minute or so.
5. Remove steak from the pan and let it rest while you prepare the salad, shallots and vinaigrette.
6. Fry shallot rings in 1 Tbsp olive oil over medium high heat for several minutes, stirring until they are brown and crispy. Move shallots to a paper towel to soak up any excess oil.
7. Mix up vinaigrette and combine salad ingredients (minus the steak). Pour a few tablespoons of dressing over the salad.
8. Before serving, slice the steak against the grain and sprinkle with additional salt and pepper if needed. I found it helpful to mix the salad up a little after adding the steak. This helped to further distribute the vinaigrette and kept the pecans, cheese and cranberries from congregating at the bottom of the bowl.

ENJOY! I know you will. :)